Beton , kommt darauf an , was man daraus macht

hallo

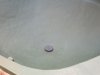
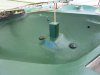
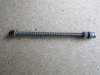
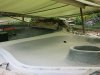
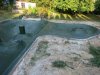
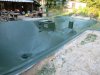
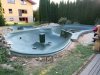
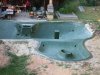
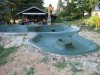
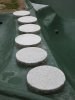
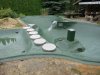
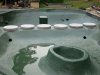
Heute habe ich die Bodenabläufe montiert.

1 normaler und 2 belüftete.

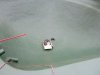
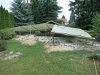
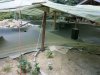
Außerdem habe ich die Kammer für die Belüfterpumpen mit Dichtschlämme abgedichtet. Weil die Kammer nur mit Regenwasser in Kontakt kommt finde ich , dass eine Beschichtung mit GFK überflüssig ist. Ist auch wegen den Rohren und der Enge dadrinnen mir zu mühselig.

Gruß
Arno
 

Anhänge

  • k-IMG_0381.JPG
    k-IMG_0381.JPG
    17,9 KB · Aufrufe: 1.369
  • k-IMG_0376.JPG
    k-IMG_0376.JPG
    32,5 KB · Aufrufe: 1.369
  • k-IMG_0377.JPG
    k-IMG_0377.JPG
    22,7 KB · Aufrufe: 1.369
So, heute ist mal der Bastel-Quastel bei mir raus gekommen.

Damit die Koi nicht in die Rohre des Rücklaufes vom Filter und den Strömungspumpen reinschwimmen , habe ich mir da einen einfache Lösung ausgedach.

Das ganze besteht aus einem 5mm Edelstahl Gewindestab an deren Ende eine Hutmutter zum Spannen sitzt. Diese wurde vorher an einem Schleifstein spitz zugeschliffen.
Auf einer Seite wird die Hutmutter bis zum Anschlag festgedreht und auf der anderen Seite wird die Hutmutter im KG-Rohr gespannt und mit einer Kontermutter gesichert.

Das ganze funktioniert sau guddddd :thumleft: :thumleft:

Aber seht selbst

Gruß
Arno
 

Anhänge

  • k-IMG_0390.JPG
    k-IMG_0390.JPG
    41,5 KB · Aufrufe: 1.236
  • k-IMG_0394.JPG
    k-IMG_0394.JPG
    29,5 KB · Aufrufe: 1.235
  • k-IMG_0385.JPG
    k-IMG_0385.JPG
    62,8 KB · Aufrufe: 1.235
  • k-IMG_0384.JPG
    k-IMG_0384.JPG
    83,6 KB · Aufrufe: 1.235
hallo

Da bei uns heute Feiertag war , habe ich mal die Kammer mit den Strömungspumpen fertig gestellt.
 

Anhänge

  • k-IMG_0399.JPG
    k-IMG_0399.JPG
    56,5 KB · Aufrufe: 1.131
  • k-IMG_0398.JPG
    k-IMG_0398.JPG
    62,1 KB · Aufrufe: 1.131
  • k-IMG_0397.JPG
    k-IMG_0397.JPG
    48,3 KB · Aufrufe: 1.131
  • k-IMG_0396.JPG
    k-IMG_0396.JPG
    40,3 KB · Aufrufe: 1.129
so , am Wochenende hat sich mal wieder etwas getan.

Die Trockenmauer unterhalb des Wasserfalls wurde (fast)fertig gestellt .
Außerdem wurde die Überdachung entfernt und der Betonrand sauber mit der Flex nachgeschnitten.
 

Anhänge

  • k-IMG_0409.JPG
    k-IMG_0409.JPG
    99,6 KB · Aufrufe: 1.034
  • k-IMG_0408.JPG
    k-IMG_0408.JPG
    68,1 KB · Aufrufe: 1.034
  • k-IMG_0412.JPG
    k-IMG_0412.JPG
    51,2 KB · Aufrufe: 1.034
  • k-IMG_0405.JPG
    k-IMG_0405.JPG
    55,4 KB · Aufrufe: 1.034
und noch
 

Anhänge

  • k-IMG_0421.JPG
    k-IMG_0421.JPG
    84,5 KB · Aufrufe: 1.025
  • k-IMG_0420.JPG
    k-IMG_0420.JPG
    69,7 KB · Aufrufe: 1.025
  • k-IMG_0418.JPG
    k-IMG_0418.JPG
    69,6 KB · Aufrufe: 1.025
  • k-IMG_0417.JPG
    k-IMG_0417.JPG
    87,5 KB · Aufrufe: 1.026
und die letzten für heute
 

Anhänge

  • k-IMG_0430.JPG
    k-IMG_0430.JPG
    88,8 KB · Aufrufe: 1.024
  • k-IMG_0432.JPG
    k-IMG_0432.JPG
    69 KB · Aufrufe: 1.025
  • k-IMG_0423.JPG
    k-IMG_0423.JPG
    88,8 KB · Aufrufe: 1.024
  • k-IMG_0422.JPG
    k-IMG_0422.JPG
    92,8 KB · Aufrufe: 1.023
Hallo,
Hut ab ! Ich platz vor Neid :wink: . Und alles in Eigenregie ? Eine wunderbare Form und das mit den Materialien :thumleft: :thumleft: :thumleft:
Und deine Doku - ebenso spitze.
Viel Spaß beim Schluss-Spurt
Bin gespannt auf´s Endergebniss

Gruß Andi
 
moin moin

Danke Andi , schön , dass er Dir gefällt. :D :D :D

Am Wochenende ging es dann weiter.
Steine rücken war angesagt.

Zuerst habe ich die Trittsteine aus Granit mit einem Durchmesser von 50cm auf den Wall zwischen Teich und Flachwasserzone gesetzt.
 

Anhänge

  • k-IMG_0442.JPG
    k-IMG_0442.JPG
    54,7 KB · Aufrufe: 783
  • k-IMG_0443.JPG
    k-IMG_0443.JPG
    69,6 KB · Aufrufe: 784
  • k-IMG_0441.JPG
    k-IMG_0441.JPG
    49,2 KB · Aufrufe: 784
  • k-IMG_0440.JPG
    k-IMG_0440.JPG
    93,8 KB · Aufrufe: 783
mal ein paar Bilder von den Findlingen , die in den Teich kommen .
 

Anhänge

  • k-IMG_0438.JPG
    k-IMG_0438.JPG
    83,9 KB · Aufrufe: 753
  • k-IMG_0437.JPG
    k-IMG_0437.JPG
    99,4 KB · Aufrufe: 753
  • k-IMG_0439.JPG
    k-IMG_0439.JPG
    107,6 KB · Aufrufe: 754
  • k-IMG_0434.JPG
    k-IMG_0434.JPG
    111 KB · Aufrufe: 754
und noch

Die beiden letzten mussten unten plan gearbeitet werden , damit Sie nicht so hoch aus dem Wasser ragen.
 

Anhänge

  • k-IMG_0403.JPG
    k-IMG_0403.JPG
    92,2 KB · Aufrufe: 746
  • k-IMG_0404.JPG
    k-IMG_0404.JPG
    92,7 KB · Aufrufe: 746
  • k-IMG_0436.JPG
    k-IMG_0436.JPG
    81,6 KB · Aufrufe: 746
  • k-IMG_0435.JPG
    k-IMG_0435.JPG
    97,6 KB · Aufrufe: 745
mal ein paar Bilder vom setzen der Findlinge
 

Anhänge

  • k-DSC09505.JPG
    k-DSC09505.JPG
    80,6 KB · Aufrufe: 722
  • k-DSC09510.JPG
    k-DSC09510.JPG
    101,1 KB · Aufrufe: 723
  • k-DSC09500.JPG
    k-DSC09500.JPG
    95,3 KB · Aufrufe: 722
  • k-DSC09514.JPG
    k-DSC09514.JPG
    73,5 KB · Aufrufe: 722
und jetzt mal ein Rundgang im Uhrzeigersinn um mal das Ausmaß des ganzen ''Wahnsinns zu sehen'' :shock: :shock: :shock:
 

Anhänge

  • k-IMG_0459.JPG
    k-IMG_0459.JPG
    91,1 KB · Aufrufe: 697
  • k-IMG_0458.JPG
    k-IMG_0458.JPG
    58,2 KB · Aufrufe: 697
  • k-IMG_0456.JPG
    k-IMG_0456.JPG
    56,2 KB · Aufrufe: 698
  • k-IMG_0454.JPG
    k-IMG_0454.JPG
    64,4 KB · Aufrufe: 698
Oben